This is software that combines internal and outside Management Information Systems (MIS) across the continuum of the entire business, considering major aspects of finance functions, manufacturing, marketing, sales and service, materials management, Customer Relationship Management (CRM) etc. The main objective of SAP is to facilitate and harmonize smooth flow of data and information within and outside the organization.
The SAP Certificates works on Module basis and candidates would need to take exams and qualify with the required pass percentages, which are known immediately after s/he takes the tests. While there are major job opportunities for people who are SAP Certified, this does not really guarantee SAP jobs but this could be well used to improve one’s current qualifications and be better armed in the employment arenas. In other words, SAP Certification supplements other qualifications and improves one’s prospect in job markets, especially in companies who are themselves SAP based or who understand, appreciate and value SAP Certification all over the globe.
Evolution of SAP Certification over the years
SAP has indeed evolved over the years. It is not what it was say 2 decades ago, nor is it forecast to be what it is today, some decades later into the 21st century. SAP has kept good pace with technological and learning changes, improvements and are set to be in tunes with changing work demands, experiences, work skill sets and experience needed to manage enterprise in challenging 21st Century times.
Some decades ago, SAP just focused on OLTP systems – this has given way to OLAP systems with greater use of HANA, BOBJ, BPC and Mobile technologies. While there are benefits, there are also risks and challenges in SAP not only in terms of investment costs, but also whether this could offer cost-benefits when compared to high investments costs, which is okay if borne by employers but rather hefty and enormous when having to be borne by individual SAP employee aspirants
Employability and career chances of SAP Certification
If people think that their career challenges are over if they are able to gain SAP credentials, they need to rethink since this does not provide solutions to career challenges. There are indeed costs and need for experience from SAP Provider also involved. Another real issue is whether future employers do value SAP Certification and need to employ this genre of cutting- edge professionals or not.
The scope of SAP does consider major changes in staff work processes and practices. Reliance on three major services helps implement such changes and they are in terms of Consultations, Customizations and Clientèle support. Running time depends on several variables like size of business, quantum of modules, scope for customization and its apparent cost benefits and cost effectiveness and the scope and benefits of process changes over the short and long terms
Conclusion
To a very large extent , the demands from SAP in terms of employability, career advancement, oversees jobs in SAP- enabled companies and other ambitions are best realized through SAP Certificates but it must be remembered that this may not hold good for all SAP aspirants.
Author Bio: James Wilson is a writing enthusiast and is currently working at EssayReviewo.com, an online portal to help users with writing guides, instructions and best essay writing service list to stay safe with their academic writing deals. So far he had contributed many of his thoughts with users through this platform.
SAP Expert has written recently about the methods to maintain calendars in SAP. It was explained there that the logistics calendar consists of holidays, holiday calendar and a list of working days.
What is the most common use of the calendars? You are right, there are many. Just to list a few:
calculate payroll
plan work for staff
plan SAP background jobs
The unusual purpose
For most of us, the calendar has a pretty simple structure. There are years, there are 12 months in each year, there are 28 to 31 days in each month.
But not all the activities go well with that simple structure. The difficulty comes into place when you need to account for weeks and/or irregular periods. Weeks may be split between months, and even between years. Some activities may have an irregular period.
One of the possible examples is the 4-5-4 or 4-4-5 fiscal year calendar, so widely used by Retail companies, and even some non-Retail companies where like-for-like comparison is quintessential.
What is 4-5-4 or 4-4-5? This is a split of fiscal periods into chunks of 4, 5, and 4 weeks in a quarter. Or 4, 4 and 5, if you want. For example:
Period 1 starts on the 1st of January and runs for 4 weeks.
Period 2 starts on the 29th of January and runs for 5 weeks.
Period 3 starts on the 5th of March and runs for 4 weeks.
Period 4 starts on the 2nd of April and runs for 4 weeks.
And so on…
Your fiscal year then consists of 4 quarters, in which each quarter has exactly 13 weeks.
I leave it to you to think about benefits of this approach to a fiscal year split.
Now imagine you need to plan SAP background jobs to cover exactly each of the periods. Of course, you can schedule it to start on a particular day of the month which definitely falls within a period, for example the 10th. However, how can you tell the system that you need to select dates between the 1st and 28th of January for the 1st period, and between the 29th of January and 5th of March for the 2nd period? There is no fixed number of days between the execution date and start/end dates of the period.
Here comes the calendar! Apart from elements listed above, holidays, holiday calendars and a list of working days, it may contain “special rules”. These special rules allow you to define one-off working or holiday days outside of the normal schedule.
Creating the Calendar with Special Rules
Let’s go into transaction SCAL and create a Logistics Calendar.
Give it a name, a code, a validity range, and leave all other fields empty. There is no default holidays calendar, there are no default working days.
Logistics calendar
Save your data.
Now click the “Special rules” button. It gives you an option to add one-off rules to the calendar. Start with creating a new rule. Specify the start and end date for the rule as the same day, for example 01.01.2014, tick the “Workday” checkbox and give it a description “Start of Period 1″.
Special rule in the calendar
Confirm the creation of the rule.
Now do the same for the following dates:
28.01.2014, naming it “End of Period 1″.
29.01.2014, naming it “Start of Period 2″.
04.03.2014, naming it “End of Period 2″.
and so on.
At the end, your list should look like this:
List of special rules
It includes start and end dates of each irregular period.
Now save your data and leave transaction SCAL.
You can now move your configuration, if this is required. Use the method described in this article by SAP Expert.
Using the calendar
Now let’s create a variant that would use the calendar we have just created.
My example uses the FBL3N transaction, but you may apply the same approach to any report where date range selection is required.
Specify the Dynamic Date Calculation option for that field in the variant and select “Date – xxx, Date + yyy (work days)” in the list of variables.
Setup of variable in the variant
When you make this selection, another pop-up window appears. Here you specify “3” as xxx value and “2-” as yyy value. Factory calendar should be specified as the one we have created on the previous step.
Calendar in variable calculation
Confirm your selection and save the variant.
Now you can apply the variant and see that SAP automatically calculates the date range from the calendar.
FBL3N with variant applied (click to enlarge)
The last step is to schedule the job that would use the variant we have just created. Make it run on the date which always falls inside the period.
Now, when the job runs, it will use the dates from your irregular intervals.
What are the other unusual applications of SAP Calendars you know?
There are many people in the SAP world who started working in this area many years ago. Five, ten, even twenty or thirty years of experience are not that uncommon. For them, as for myself, SAP is mostly an ERP system written on ABAP programming language.
But if you are new to this world, your view on SAP may be very different.
In my opinion, the change started when SAP (as a company) started to implement non-ABAP tools into the ERP system. I mean Java stack.
The addition of a Java layer was meant to help developers. And I hope it did.
In the meantime, SAP (as a company) started to move into the adjacent areas and also went shopping.
SAP Portal, SAP HANA and some others are SAP developments that are aimed at the non-ERP segment of business applications.
At the same time, Siebel, Fiori and others represent acquisitions that are ERP satellites.
Many of these new products have nothing to do with ABAP. Some of them have nothing to do with ERP either. But SAP still had a point in developing or acquiring them: they want to deliver a complex solution from a single vendor for the end customer.
Sometimes the integration of the complex solution goes well. Sometimes, especially on early and ramp-up phases, not so smoothly. Unfortunately, it is quite often that the customer pays for the additional development for the integration and loses money due to a lack of experience on the part of the implementation team. That is life…
What does that mean for us as consultants? It means you can now spread your knowledge to a wider range of systems and technologies, if you wish. It also means that ABAP knowledge may be unnecessary even for an experienced SAP consultant, if (s)he works in a non-ABAP environment.
What do you think about the future of SAP products? What is the SAP vision, from your point of view? Where will all of us end up?
Today we will look at this question from a slightly different point of view. Say you don’t know the specific field, but you know the name of the configuration table that contains it. It is very likely you will be able to find the name of the configuration table in SAP forums, SAP Notes or any other resource. Can you actually maintain the table knowing only its name?
The generic answer is: use transaction SM30. You can either launch this transaction using its code, or by choosing menu System – Services – Table Maintenance – Extended Table Maintenance on any SAP screen.
Let’s look at several options to use this transaction.
Direct maintenance in SM30
This is a very straight forward way to maintain the table. Put the table name into the only field on the screen and click the button “Maintain”.
SM30 – USR40
You get directly into the maintenance screen of the table in question.
SM30 – USR40 – maintenance
However, often you get the message “The maintenance dialog for … is incomplete or not defined” quoting your table name. It means that it is time to try option number 2.
Find a customizing transaction in SM30
Put the table name into the field on the screen and click the button “Customizing”.
SM30 – T030K
You will get a pop-up window where you can put an IMG project name for an additional search restriction, or “Continue w/o Specifying Project”. It is exactly the same window that is mentioned in points 2 and 3 of the previous article. Obviously, the results will be the same: you will get a list of IMG nodes where you can maintain the table in question.
However, even this approach does not guarantee a result. You may get a message “No object … maintenance IMG activity exists” quoting your table name, or none of the IMG nodes from the list will be the one you need. It means that it is time to try option number 3.
Find a maintenance view in SE11
Start transaction SE11 and put your table name into the field “Database table”. Don’t forget to check that the radio-button switch is in the correct position too. Now click button “Where-Used List” on the panel.
SE11 – GB01
You will get a pop-up window with a list of ABAP objects where your table is used. Tick checkbox “Views” leaving all other checkboxes unticked. Press Enter to continue.
SE11 – where-used list
You will get a list of table views relevant to the table you want to maintain. Now copy-paste your view name into the SM30 transaction and try both of the options described above.
Another way is to double-click the view name in the list. This will take you to the list of fields in the view. From there, click the “Contents” icon on the panel.
SE11 – view contents
You will see the maintenance view for the table in Display mode. You only need to switch to Edit mode if you need that.
Hopefully, you now can maintain the table you wanted.
Do you know other ways to maintain a table in SAP?
With the year 2014 in the history books, most have shifted their focus into 2015. The New Year means a lot of promises from getting in shape to going back to school. Early in the year gyms may be overcrowded and universities may see increased enrollment but, in most cases, these resolutions are short lived. Why? They are purely individual with only one person to hold you accountable for seeing that your goal gets completed.
Instead of a personal resolution, why not shift the focus and make a change that will last? Promising to invest in your business, where dozens of employees eagerly await the changes, is worthwhile and more likely to be seen through to fruition. One of the best and most intelligent investments a business can make is in technology that can make the operations run more smoothly. An ERP solution, or Enterprise Resource Planning system, is a good place to start, considering that it will reap benefits for almost every aspect of the organization.
When considering your ERP options, keep in mind that there is a vast different between an update and an upgrade. Updates are smaller changes made to existing software that do not affect the interface or navigability, but may increase certain functions or fix specific bugs with that version of the software. Upgrades, on the other hand, are often major software overhauls that have a new look and contain a number of new features while making previous functions obsolete. While updates are usually free, software upgrades can be costly and may require hardware upgrades, too. Because of this, it is important to know which one you need before you invest both your time and money in a new system.
Updates and upgrades are important for ERP systems for a variety of reasons, five of which will be outlined in more detail below.
1. Most business operations will benefit.
In the same way that companies shouldn’t feel pressured to implement new technology because they “have to,” software upgrades shouldn’t happen just for the sake of technology. Sometimes ERP vendors stop providing upgrades or software support for the existing version and in such cases, upgrading your ERP software becomes a must. Even so, there should always be a clear benefit for investing in a new system, especially one that outweighs the financial cost.
When upgrading an ERP system, the company should expect to receive a return on their investment in addition to other clear benefits. These benefits may include a more efficient procedure or streamlined business operations. With an ERP system, companies can be sure that they will reap the benefits across many different areas of the business, further legitimizing their investment.
2. Elongate the lifespan.
With a typical lifespan of 15-20 years, ERP systems allow an organization to manage and automate many back office functions related to technology, services and human resources. The benefits of streamlining and integrating all aspects of business operations can last for many years but in order to ensure that these benefits continue, it is important to execute periodic upgrades on the ERP system. If these upgrades are ignored, the lifespan of the system can be reduced by as much as half.
3. Helps to meet business objectives.
One of the major strengths and selling points of an ERP system is that they are designed and tailored based on the specific goals of the company. With short and long-term goals in mind, businesses choose to invest in the system to help keep them on track to meet these goals. Many strategic plans, however, span across a series of years, enduring market changes that may negatively affect the original plan of the company. If the company’s business objectives or relevant market conditions have changed, then it is time to upgrade the ERP system accordingly. The system should be reconfigured to the new, or slightly adjusted, goals of the company before continuing along with the strategy.
4. Maintain the bottom line.
In the business world, everything comes down to the bottom line. Efficiency is one of those magic words that financial leaders love to hear. Why? It means a reduction of costs as well as a potential decrease in the amount of labor needed to get tasks completed. When quantifying the effects of upgrading your ERP system or keeping your operations as they are, your company can make a cost-based decision that best aligns with your company’s budget and strategy. Long-term costs of ERP systems can be kept under control by performing periodic updates, while reaping the benefits of integration instantly.
5. Expose business opportunities.
As mentioned in the previous section, a cost analysis can be critical to making a decision on updating your ERP software. In this process, it is easy to skimp out on a necessary purchase for the sake of saving a few dollars. For this reason, companies should keep in mind other opportunities that can arise from investing in a new ERP system. Companies can enjoy benefits including increased communication, efficiency, productivity and visibility of day-to-day operations. In this streamlining process, companies can often identify business opportunities, clarify their competitive advantage and focus on the areas where it excels.
With the New Year still fresh, you have time to make the important decisions that will shape 2015. Start investing in a new ERP system or a necessary upgrade for your business, and reap the benefits of an efficient and well-functioning, money-making process.
Bio: Deanna Ayres is the SEM Strategist and Community Outreach Supervisor at The Marketing Zen Group & TGO Consulting. She loves to come up with new content strategies for and with her team and believes that connecting on a personal level is vital to success. Growing up in Europe has allowed her a unique insight into cultural differences in business & marketing. In her spare time she is a photographer, hobby cook with a love for coffee, gamer and geek. Follow her @deanna_ayres
From beepers and 8-bit computers to smart phones and cloud storage, each new wave of technological innovation builds upon its predecessors. With every new gadget or piece of software, business professionals are finding new and creative ways to use technology to their advantage. Nowadays, if you want to give your business the best chance to succeed, you need to stay at least one step ahead of the technological curve.
Although enterprise resource management (ERP) software has been around for many years, modern systems provide a number of convenient new features that older programs simply cannot offer, including remote access, cloud storage, and information in real time. Upgrading your ERP system is not free, but it can actually save more money in the long run than if you stick with old, outdated software.
Skeptical? It’s understandable. ERP systems are an investment in the future of your company and there is always some degree of risk involved in any business decision. However, the potential benefits of modern ERPs far outweigh the short-term inconveniences that can be associated with switching or upgrading your software. Here are five advantages of modern ERPs that can help save both time and money:
1. Greater accessibility
Most ERPs perform the same function: to compile information about the day-to-day operations at every level of your business (customer service, accounting, inventory, human resources, etc.) into one centralized, easy-to-navigate system. However, with cloud storage and remote access, modern ERPs have an easy advantage over their DSL ancestors. Now, you can securely access up-to-date information about your business from anywhere in the world as long as you have Internet connection. You don’t have to worry about leaving for a meeting or a business trip and forgetting an important document at the office. It is all still available to you with a few swipes of your index finger.
2. The availability of real-time data
With the integration of mobile technology into ERP software, data is more accessible than ever before. Many modern systems like Sage ERP X3 and SYSPRO Espresso have mobile platforms that allow their users to retrieve real-time information from remote locations on their smartphones and tablets. Thanks to modern ERP systems, you can be at a business meeting in New York and know exactly how your company in Sidney is doing while you are away. The instantaneous availability of real-time data allows you to readjust your goals and expectations accordingly and catch potential problems before they occur, helping you stay one step ahead of the game.
3. Improved financial consolidation
Without an ERP, many businesses are forced to use different programs in separate departments. Accounting may use one system while HR and inventory use something completely different. When the time to do quarterly reports or company taxes rolls around, the information from all of these programs is compiled into external databases known as data silos. The downside of data silos is that they cannot exchange information with other software, making it difficult to consolidate your finances because you have to spend time going back and forth between programs. However, ERP systems virtually eliminate this tedious and migraine-inducing task by doing all of the work for you.
4. ERPs are tax-friendly
Having financial information from all areas of your business consolidated into one central place is extremely handy come tax season. ERP systems track every dollar and pound your company earns or spends and can keep these records for many years afterwards – for as long as you keep the software, basically. ERPs are especially valuable to online companies because they can calculate the correct sales tax on out-of-state or international orders, which your future self will appreciate when it is time to do your taxes.
Combined, these features can help you avoid making costly accounting errors on your taxes that could result in an audit. And if that dreaded moment does occur, your ERP has years of your financial records already compiled into an easily navigable program. With an ERP system, you do not have to worry about losing paper invoices or old tax documents in some dusty old filing cabinet because all of your data is stored on your computer, backed up on cloud storage, and accessible from your smart phone.
5. Reduced operational costs
In addition to monitoring your finances, ERP systems also keep track of inventory, deliveries, shipments, labor costs, etc. This provides insight on both the macro and micro levels of your business. You can track specific items in a warehouse (which also helps with loss prevention) or check up on individual workers, but you can learn about “big picture” stuff as well. What are your business’ busiest days? Which departments are most efficient? How long does it take to process an order or request? Knowing the answers to these questions can help you reduce overhead while expanding your business by cutting unnecessary expenses.
Because ERPs are comprehensive systems, they eliminate the need for separate programs in every department and help save money spent on hardware, software, and labor. With one system for your entire business, you don’t have to worry about needing hardware to support three or four different programs spread out over multiple departments. Less software usually results in fewer technical difficulties, which eliminates the need for a large IT department. When all is said and done, many ERPs can decrease your administrative and operational costs by 15% or more.
Choosing the right ERP for your business can be a difficult decision, but do not let that deter you from upgrading your software. It will be well worth it in the long run. Remember to take your time and think carefully – you do not want to purchase expensive add-ons that will do little to improve your business. If you are unsure where to start, you should speak with an ERP consultant to figure out exactly what you want and need out of your enterprise resource planning system. Set up a meeting and start investing in the future today!
Hayley Irvin is the SEM Strategist and Outreach Supervisor at the Marketing Zen Group. A native Oklahoman, she loves storms, sunsets, summer, and the OKC Thunder. When she’s not creating awesome content for Marketing Zen, Hayley enjoys writing about basketball, learning about space, and spoiling her pets. She believes collaboration is the key to creativity and loves working with new people. Catch up with her on Twitter @HayleyNIrvin.
There is a number of resources in the Internet that contain helpful information about SAP. Just to name a few: SAP Help, SAP Notes, SCN / SDN, independent SAP-related forums, independent SAP resources like SAP Expert.
What do you actually use when searching for the answer to your SAP Questions? Let’s vote!
Note: There is a poll embedded within this post, please visit the site to participate in this post's poll.
We’ll get the answers in a month’s time. In the meantime, if you have questions to SAP Expert, why not ask them directly?
SAP Expert has written recently about the methods to maintain calendars in SAP. It was explained there that the logistics calendar consists of holidays, holiday calendar and a list of working days.
What is the most common use of the calendars? You are right, there are many. Just to list a few:
calculate payroll
plan work for staff
plan SAP background jobs
The unusual purpose
For most of us, the calendar has a pretty simple structure. There are years, there are 12 months in each year, there are 28 to 31 days in each month.
But not all the activities go well with that simple structure. The difficulty comes into place when you need to account for weeks and/or irregular periods. Weeks may be split between months, and even between years. Some activities may have an irregular period.
One of the possible examples is the 4-5-4 or 4-4-5 fiscal year calendar, so widely used by Retail companies, and even some non-Retail companies where like-for-like comparison is quintessential.
What is 4-5-4 or 4-4-5? This is a split of fiscal periods into chunks of 4, 5, and 4 weeks in a quarter. Or 4, 4 and 5, if you want. For example:
Period 1 starts on the 1st of January and runs for 4 weeks.
Period 2 starts on the 29th of January and runs for 5 weeks.
Period 3 starts on the 5th of March and runs for 4 weeks.
Period 4 starts on the 2nd of April and runs for 4 weeks.
And so on…
Your fiscal year then consists of 4 quarters, in which each quarter has exactly 13 weeks.
I leave it to you to think about benefits of this approach to a fiscal year split.
Now imagine you need to plan SAP background jobs to cover exactly each of the periods. Of course, you can schedule it to start on a particular day of the month which definitely falls within a period, for example the 10th. However, how can you tell the system that you need to select dates between the 1st and 28th of January for the 1st period, and between the 29th of January and 5th of March for the 2nd period? There is no fixed number of days between the execution date and start/end dates of the period.
Here comes the calendar! Apart from elements listed above, holidays, holiday calendars and a list of working days, it may contain “special rules”. These special rules allow you to define one-off working or holiday days outside of the normal schedule.
Creating the Calendar with Special Rules
Let’s go into transaction SCAL and create a Logistics Calendar.
Give it a name, a code, a validity range, and leave all other fields empty. There is no default holidays calendar, there are no default working days.
Logistics calendar
Save your data.
Now click the “Special rules” button. It gives you an option to add one-off rules to the calendar. Start with creating a new rule. Specify the start and end date for the rule as the same day, for example 01.01.2014, tick the “Workday” checkbox and give it a description “Start of Period 1″.
Special rule in the calendar
Confirm the creation of the rule.
Now do the same for the following dates:
28.01.2014, naming it “End of Period 1″.
29.01.2014, naming it “Start of Period 2″.
04.03.2014, naming it “End of Period 2″.
and so on.
At the end, your list should look like this:
List of special rules
It includes start and end dates of each irregular period.
Now save your data and leave transaction SCAL.
You can now move your configuration, if this is required. Use the method described in this article by SAP Expert.
Using the calendar
Now let’s create a variant that would use the calendar we have just created.
My example uses the FBL3N transaction, but you may apply the same approach to any report where date range selection is required.
Specify the Dynamic Date Calculation option for that field in the variant and select “Date – xxx, Date + yyy (work days)” in the list of variables.
Setup of variable in the variant
When you make this selection, another pop-up window appears. Here you specify “3” as xxx value and “2-” as yyy value. Factory calendar should be specified as the one we have created on the previous step.
Calendar in variable calculation
Confirm your selection and save the variant.
Now you can apply the variant and see that SAP automatically calculates the date range from the calendar.
FBL3N with variant applied (click to enlarge)
The last step is to schedule the job that would use the variant we have just created. Make it run on the date which always falls inside the period.
Now, when the job runs, it will use the dates from your irregular intervals.
What are the other unusual applications of SAP Calendars you know?
There is a number of resources in the Internet that contain helpful information about SAP. Just to name a few: SAP Help, SAP Notes, SCN / SDN, independent SAP-related forums, independent SAP resources like SAP Expert.
What do you actually use when searching for the answer to your SAP Questions? Let’s vote!
Note: There is a poll embedded within this post, please visit the site to participate in this post's poll.
We’ll get the answers in a month’s time. In the meantime, if you have questions to SAP Expert, why not ask them directly?
When you include substitutions and validations in the transport request, one of the options you have is to also put sets into the same request.
Transporting validation
Just to remind, a set is a very convenient tool to modify your validations or substitutions directly in a production system, for example temporarily switch them off.
What happens if you tick the checkbox on the screen and include sets in the transport? The system will include content of all sets from the development client that are used in all the steps of the validation or substitution. Moving sets across the landscape will replace content of the sets in all clients with what you had in your development system. That is a risky thing, if you maintain your sets directly in production – and that was the purpose, wasn’t it?
Does it mean you should not move sets at all then? Always create them manually in each client? Not at all! SAP gives you a separate option for moving sets individually, if you just created them for a new validation or substitution. Even three options!
As usual, you created the set using transaction GS01 and used it in a validation or substitution step. To move your set to another client or system, you have a choice of options.
Option 1. Export-import
This option allows you to move the content of your set via a file that you move manually between the systems. Start transaction GS02 and select menu Utilities – Transport – Export. You will get a screen with selection criteria for sets you want to export to the file. There is a field at the bottom of the screen where you specify the file location.
Export set
Once you make the selection criteria, run the report. The next screen will show you a list of sets that meet the criteria: there may be several of them.
Export set, step 2
Mark the sets you are interested in and execute the report.
Your file will be created. It is a text file in a specific format.
Export set, step 3
Now log into your target client and run transaction GS02 again. Select menu Utilities – Transport – Import, and specify the path to the file with set contents that you created previously.
Import set
The system will import the set from the file and give you a confirmation about the same.
Import set, step 2
Option 2. Copy from client
This option only works if you want to copy the set contents between the clients of the same system, for example from Development to Test clients of the Development system.
Start transaction GS02 and select a menu option Utilities – Transport – Copy from client.
Copy set
The following steps are very similar to the previous option. You need to confirm which sets you need to copy from your source client. At the end you will receive a confirmation.
Option 3. Move with the transport
This option allows you to utilize the SAP standard functionality for moving changes between the systems: the transport system.
Start transaction GS02 and select menu Utilities – Transport – Transport request. You will be given a choice between Sets and Variables. Select Sets and proceed with the Execute button.
Transport set
The next selection screen gives you criteria to select sets to transport. It is very similar to the screen we have seen above for exporting sets into the file, with an exception that there is no field for a filename.
Transport set, step 2
When you make your selection criteria, execute the report and it will give you a list of sets that meet your criteria. Select the ones you want to move to another system and run the report again.
Transport set, step 3
A new window will appear where you need to put the transport request number.
Transport set, step 4
Once this is done and confirmed, your set will be included into the transport request, ready to be moved to your target client or system.
Transport set, step 5
What other objects do you move across the SAP system landscape in an unusual way?
It isn’t possible to know everything in the world. Even in the narrower SAP world nobody knows eveything. Sooner or later you come up to the question you don’t know the answer for.
SAP Expert ran a poll where you could specify the ways how you usually search for the answers to your SAP-related questions. The poll was running for 6 weeks, and 59 people voted. It was a multiple-choice voting. Every user could choose as many items from the list as he or she found relevant.
Here are the results:
Results of SAP Questions poll
The majority of voters prefer to search for the answers through SAP specialized knowledge base, SCN or SDN (SAP Community Network, SAP Developers’ Network). This option was selected by 76%, or three quaters, of voters. That proves the success of SAP initiative. The only downside of SCN/SDN is that you need to be registered with SAP to be able to ask your own questions or take part in existing conversations.
Two runner-ups with very close results are standard Internet search engines like Google, Yahoo! or Bing, and SAP Notes. These two options received 51% and 47% of votes respectively, or about half of the users selected at least one of these options. If you are not aware, SAP Notes mostly contain either fixes for found bugs in SAP standard software, or explanatory texts for the usage of SAP functionality. You have to have a special SAP user ID, or S-User, to be able to search for SAP Notes.
Less popular poll options were searches in SAP standard documentation, SAP Help, and other independent SAP resources.
SAP Expert would like to say Thank You to all the voters. Stay connected to receive more interesting updates on ERP- and SAP-related topics.
The General Ledger (GL) account is a very important element of master data in SAP. It has many configuration parameters that control system behaviour when a particular GL account is in use, either during document entry or reporting.
One of these configuration elements is the Tax category. Let’s discuss this element in detail.
Tax category
Tax category on the GL account controls the relevance of GL account to tax reporting. Under tax reporting I mean Value Added Tax, which may have different names in different countries. For example, this is GST in Singapore and Australia. I will use the word “tax” in this article only in this generic meaning of it.
Document entry
When you enter the document in SAP, it is tax category that controls the existence of a Tax Code field on the document entry screen. If the GL account has no tax category, i.e. the configuration field is blank, then you will not have the document field available. Or, if you use an Enjoy-style transaction with the table view and try to put tax code in the line item with such a GL account, you will get a warning message saying that GL account is irrelevant to tax code and the entry will be ignored.
However, if tax category is populated, you will be able to see the field on the screen. Moreover, this will be a mandatory field, unless the checkbox “posting without tax allowed” is ticked in the GL account settings.
The value you can enter in the Tax Code field depends on the Tax Category specified for the GL account. Let’s check what the options are:
Tax category = “*”. In this case, any tax code will be allowed.
Tax category = “+”. In this case, only tax codes with “Output Tax” category will be allowed.
Tax category = “-“. In this case, only tax codes with “Input Tax” category will be allowed.
Tax category = “+B”. In this case, only tax codes with “Output Tax” category will be allowed, and also the system will try to process the document as “Down payment” and create additional lines in the document, if several more conditions are met. This tax category is usually assigned to a customer reconciliation account when you need special treatment of down payments.
Tax category = “-B”. In this case, only tax codes with “Input Tax” category will be allowed, and also the system will try to process the document as “Down payment” and create additional lines in the document, if several more conditions are met. This tax category is usually assigned to a vendor reconciliation account when you need special treatment of down payments.
Tax category = “>”. This is the GL account for output tax. In this case, only tax codes with “Output Tax” category will be allowed, but you usually don’t post to this account directly.
Tax category = “<“.This is the GL account for input tax. In this case, only tax codes with “Input Tax” category will be allowed, but you usually don’t post to this account directly.
Tax category = tax code. In this case, only the tax code entered in the GL master record will be allowed in the document posting.
I will refer to accounts with categories “<” and “>” as “Tax Accounts”. You can get more details on “+B” and “–B” tax categories in the free e-book “FREQUENTLY ASKED QUESTIONS ON SAP FINANCE“.
Usually, tax category is blank on GL accounts for Assets, salary expenses, bank or retained earnings. They are not really relevant to tax, are they? You usually assign tax category “+” to a taxable revenue GL account and tax category “-” to a taxable expenses GL account.
When tax code is entered in the GL account line item, and tax amount for that tax code is not nil, SAP will automatically generate additional line items in the document. These items usually contain GL accounts with “<” or “>” tax categories as configured in the tax code.
Reporting
Once the document is entered with a tax code, the system stores tax data for the document. Of course, some of this data is stored in the main Finance table BSEG. But a more important table in this case is BSET. This is the table where all the tax information for each document is stored.
Table BSET contains summarized information for each document broken down by tax code. There is information about the tax code, tax amount, tax base and even condition record from within the tax procedure settings. There may be no tax line items in the documents, but it still records in BSET. This is the case for zero-rated tax codes.
Table BSET does not have information on the “source” line items of the initial document where tax code is used. If there are several “expenses” line items with the same tax code in the document, table BSET will contain summarized information only. If you also take into account that there is one auto-generated line item per tax code in the document, you understand that from the moment of document saving there is no easy way to break down tax information by GL account details like account number, Cost Centre and so on. The way you can do this in New GL is to split tax GL (i.e. GL account with “<” or “>” tax category) in the document. But this will be information from the NewGL level, not from the tax table.
You can check details stored in table BSET by going into the document and clicking the “Taxes” button on the panel. A pop up window contains the tax-related document information, extracted from table BSET.
Further, BSET is the most important table for tax return. Tax return usually is generated by a program RFUMSV00, which can be modified in some countries to account for local specifics. This program may be called by different transaction codes, of which the most common one is F.12. This program extracts BSET information, enriches it with some external data, like vendor address for example, and then groups information to be represented in the tax return view. Of course, there is a lot of additional logic in the program, but it deserves a separate discussion.
When the document is processed by program RFUMSV00 in “Update mode”, the same tax return program updates BSET records with the date and time stamp. This prevents the same document from appearing in different tax returns more than once.
The same program RFUMSV00 can generate a batch input session that transfers amounts from the tax return from tax accounts (with categories “<” and “>”) to a tax reconciliation account – to be paid later to tax authorities.
If there is no tax category in the GL account details, the system will not ask for tax code for line items posted on this account. The BSET table will not be populated for the document. The document display will not contain the “Taxes” button. The document will not show in the Tax Return output. Very simple logic: no tax code – no tax return.
Changing tax category
You need to define tax category for the GL account at the time you create it. This is because there are many dependencies around: tax code configuration, automatic postings, variants and so on.
But life is life. Business requirements change with time, and it becomes necessary to change the GL account tax category.
Changing the tax category for the GL account is a possible though often a painful operation.
In this case, first think if there is an alternative way. Would creating a new GL account with a similar name and number solve the issue? If yes, then go ahead and create the account.
If changing the tax category is still the only possible way, you will very likely need to bring the account balance to zero before making the GL account configuration change.
Of course, remember that changing the tax category for the GL account only affects the documents posted after the change. It will not update the existing documents retroactively. There is no way for doing this. Remember it before agreeing to the tax category change.
Do you have more questions for SAP Expert in regards to tax settings of GL account? Ask them directly or in comments to this article.
We have discussed recently the details related to tax category assignment of the GL account. In that article SAP Expert mentioned that usually you do not post amounts directly to tax accounts. But sometimes you still do.
Let’s discuss these cases in details.
Tax-only invoice
Normally the system automatically generates a line item for the tax account (i.e. GL accounts with tax categories “<” or “>”) when you enter a tax-relevant document, for example a vendor invoice.
However, there are cases when you have no other option but to enter a document directly onto the tax account. The best example is a vendor tax-only invoice. This is usually an invoice from a logistics company that deals with your imports and charges VAT on goods you bring into the country from abroad.
You can enter this document either in “classic” or “Enjoy” transactions in Finance. The difference from a normal entry process is that you must enter both tax amount and tax base when posting directly to the tax account. Or you can let SAP do the automatic reverse-calculation of tax base.
When entering the document via the “classic” transaction, there is a tax base field and “Determine tax base” checkbox directly on the entry screen.
Tax account posting in classic transaction
When entering the document via the “enjoy” transaction, the special button “Tax base” appears at the bottom of the document entry table. Clicking that button calls up a special pop-up window with tax base field and yet another button for auto-calculation.
Tax account posting in Enjoy transaction
You need also to ensure that checkbox “Post automatically only” is not ticked in the GL account details.
Direct entry on input and output tax GL accounts
Each time a document is posted to the tax account, it must have a tax code. As mentioned in the article about tax categories, a tax code in the document means that this document will be shown in the tax return.
However, there are cases when you have to enter a document directly onto the tax account, but this document isn’t relevant to tax return. It is literally the tax return posting itself: transfer between the tax accounts and the tax reconciliation account. SAP Expert has mentioned this posting when we discussed the tax return functionality. Program RFUMSV00 can do it for you. But in certain cases you may wish to post such a document manually.
Can you do this? Yes, there is a transaction code FB41 for this purpose. This transaction allows you to enter the document line item for the tax account, but without tax code in it. Because of that, your document will not show in the tax return. Transaction code FB41 is used by program RFUMSV00 for the batch input session, but you can also use it manually.
Tax retun posting
You need to also ensure that checkbox “Post automatically only” is not ticked in the GL account details.
What are other cases when you need to post to tax accounts an unusual way?
Many companies using SAP need to run Assets accounting. When an asset is being physically created, the company needs to account for costs. These costs often form a part of a balance sheet that is called “Assets under construction”.
SAP gives you an option to to accumulate costs of Assets under Construction (AuC) on the assets in a special Asset Class. Creating an asset is often a project, which lasts some time and requires additional reporting.
There is an SAP functionality to separate costs per different projects using either Internal Orders or WBS elements. These two objects, Internal Orders (IOs) and Work Breakdown Structure Elements (WBS Elements) are very similar in many aspects, while WBS elements have a more advanced functionality. However, for the purpose of this article I will only mention IOs. There is an absolute mirror in the WBS elements configuration.
It is quite logical that these elements of SAP functionality: IOs, AuCs and Assets are linked to each other. The functionality in general looks this way:
Original costs are posted during the period to P&L GL accounts with an assignment of Internal Order;
At the period end, the special program calculates the balance of IO and moves the costs to an AuC, which has a reconciliation account in the Balance Sheet part of the Chart of Accounts;
When the project is completed, the final settlement moves the costs from AuC to the final asset;
The final asset is now capitalized and ready for the depreciation.
That is a simple logic and it works if you only have one class of AuC. But many companies prefer to split costs of AuCs, for example between tangible and non-tangible assets. Can you set this up in SAP?
Let SAP Expert guide you!
1. Define Source Structure
This is the SAP configuration that you run in the Internal Orders section of IMG:
Controlling – Internal Order – Actual Postings – Settlement – Maintain Source Structure
Here you define the source structure, splitting your cost elements between at least two Source Assignments. Let’s call them “Tangible” and “Non-tangible”. Each Source Assignment contains a range or a group of cost elements. SAP automatically checks that cost elements do not overlap and gives you an error message if they do.
Source Structure
2. Define Model Order
The second step is to create a Model Order. The purpose of this model order is to be a template for the future Internal Orders, and also to hold an assignment to Investment Profile.
You can create, edit or display Model Orders in the IMG node
Investment Management– Internal Orders as Investment Measures – Master Data – Orders – Define Model Orders.
You may need to create a special Order Type for Model Orders, which you can do in a nearby configuration node. Also, you will need to assign a Model Order to the Order type of regular Internal Orders.
3. Define Investment Profile
The third step is to create an Investment Profile, which will define the parameters for settlement of Internal Orders to Assets Under Construction.
Investment Profiles are managed in IMG node
Investment Management – Internal Orders as Investment Measures – Master Data – Define Investment Profile
The most important bit here is to tick the checkbox “AuC per source structure/assignment”.
Investment Profile
Once created, you can assign Investment Profile to the Model Orders in the same IMG node.
4. Create classes for Assets Under Construction
If you want to split costs of projects between different Assets under Construction, probably with a different assignment of GL accounts, you need to have at least two different classes of AuCs.
You create these classes in the IMG node
Investment Management – Internal Orders as Investment Measures – Master Data – Assets under Construction – Define Asset Classes
You can also do the same in the Assets Accounting section of the IMG. There is no difference. The thing to remember is that AuC class should have the radiobutton “Status of AuC” set to “Investment Measure”.
Asset class for Investment Measure
5. Assign Source Structure to the classes of Assets Under Construction
The last part of the configuration is linking all the different components to each other: Investment Profile, Source Structure and AuC classes.
You can do this in the IMG node
Investment Management – Internal Orders as Investment Measures – Master Data – Define Assignment of AuC Classes per Source Assignment
AuC per source structure
You can see that my Investment Profile is assigned to different parts of Source Assignment. Each record in this table has details, where the relevant AuC class is specified.
AuC per source structure
How it all works?
Now the configuration is complete. Let’s now see how it all works.
When you create an Internal Order that is configured as Investment Measure and that has a Model Order in the Order Type setting, the system will automatically assign the Investment Profile to you IO.
You post costs to this Internal Order using different cost elements. Some of these cost elements relate to Tangible, other to Intangible parts of your Source Structure. It is important to remember that one cost element should only be in one of the Source Assignments.
When the first Periodic Settlement is run for the IO, SAP will automatically create two AuCs for the settlement. There can be more AuCs, if you had more than two Source Assignments. Even if there are no costs to be settled to the AuC of that particular Source Assignment during the first periodic settlement, SAP will create the AuC nevertheless.
Periodic settlement will then analyse the costs posted to the IO and split them between AuCs according to the Source Assignment configuration.
As long as these two AuCs have different GL accounts, you can now report these costs separately.
Have you used the Settlement Assignments on your projects?
Curriculum Vitae, or CV, or Resume is the document #1 for any job seeker. This is the document your agent and potential employer read before seeing and hearing you.
If you read any article or recommendation by an HR person related to preparing your CV, it is more likely than not you see a requirement to prepare an individual CV for each position you are applying for. It means that you need to re-write, or at least revisit your CV before sending it for an application to each position you consider.
How many of you did so? Let me guess… none!
Even if the requirement makes sense and you may re-work your CV slightly when sending it to a particular company, it is next to impossible to re-write it for each position when you are in an active job search. To make things even more difficult, many job ads don’t have enough information about the company and position to write a position-specific CV for. And worst are the agents that simply harvest CVs without letting you know the company or the position details.
At the same time there is a social network LinkedIn that allows you to have a virtual CV visible to anybody. You cannot predict who will be looking at your LinkedIn profile.
Can you follow the HR-related recommendations then? Obviously not.
You have to have a “generic” version of CV suitable for “generic” purposes.
SAP Expert would like to give you some advice about the contents of your “generic” CV. Let’s discuss what to avoid in the part where you talk about your SAP experience and modules you know.
High-level details
On one pole there are the CVs where you mention your expertise in high-level terms. You can write that you know MM and SD, or FI and FSCM. Will that be enough?
I doubt so. Each of the above mentioned components, as well as those non-listed, has many sub-components. Many of them are common, some are rarely used. If you write FI, does it mean that you also have experience in FI-TV and FI-AA? If you mention MM, does it also cover MM-LIV?
In my opinion, putting only the high-level components in your CV is as good as putting none.
Give at least some details.
Give at least some details.
Low-level details
On another pole there are CVs that list many detailed sub-components of SAP that the person dealt with. Putting such components as FI-BL-EBS, FI-BL-LB or FI-BL-CJ is excessive, in my point of view. Of course, it may be that your potential employer is looking for specific skills in Lockbox or Cash Journal. But we agreed above that we are preparing a generic CV. Most employers and agents will be lost in such narrow details, especially if you only list the abbreviations.
Don’t go into too much detail.
Whole Universe
There are CVs that simply list the whole set of SAP components disregarding the fact that the person does not have an experience in some or all of them. Putting the fact that this is simply a lie aside, it is next to impossible for any person to have knowledge in all SAP components. Even if you have 15-20 years of SAP career under your belt, it is very unlikely that you have in-depth knowledge of MM, SD, HR, Basis, ABAP, FI and CO modules at the same time. Any more or less knowledgeable HR person or agent will simply reject the CV that lists whole SAP Universe in the experience section. Even if such CV would pass this initial filter, it will get into the hands of the functional specialist who will be asked to interview you. That person will recognise this “issue” straight away and will simply reject your CV without even calling you.
Don’t overestimate your knowledge. Only list the SAP modules that you have real experience with.
Blind spots
There are some CVs that presume that the person who reads them knows much about SAP. Even if there are some agents and company HR specialists that do, many of them have next to nil SAP experience. Don’t presume that the person who reads your CV will automatically include MM-LIV module into your skillset if you list MM-PO and MM-WM. That’s not obvious. And if the HR person is looking for the specialist with MM-LIV knowledge, you are very likely to be filtered out where you should not be.
List all your knowledge areas.
Conclusion
Preparing a CV is a task of its own. It is a difficult task.
When you describe your experience for your future potential employers, be neither too shy nor too bragging. Give enough details for the person without much specialist knowledge to select your CV among the others.
Does your CV meet the ideas listed in this article?
Bank statement is the document that bank sends to your company to update you about the balances and transactions on the bank account that the company holds in that bank.
You can receive that statement in various ways. Of course, you need to process these statements in SAP to reflect the bank account transactions. That’s the accounting rule. The way how you process the statement depends on the format you get the statement in. Generally speaking, there are three ways to enter statement in SAP:
Electronic bank statement (EBS). If your bank sends the statement in the format of electronic file, you can import that file using the special tools. Usually you run transaction FF_5 or FF.5 to import such bank statement. There are various bank statement formats available for automatic processing by SAP. There is also a converter tool in transaction DMEE that allows you to convert your bespoke format to a Multicash file acceptable by SAP.
Manual bank statement (MBS). If you get your statement in a paper format or the format that cannot be automatically imported into SAP, you have an option to enter the statement details manually using the SAP transaction FF67.
Manual postings. This means you enter the statement transactions using the non-banking system tools, for example F-53, F-28 or FB01.
If you process the statement using the EBS or MBS processes, you can review the statement using the transaction FEBAN. It gives you an option to see the statements in a tree format where House Bank, House Bank Account and Statement number are the nodes and individual transactions are the end leaves. Once you click the leaf, the right part of the screen shows the details of the transaction. In particular, it gives you an overview of posting status for the statement item.
FEBAN screen
What can you see there?
To start with, there are two postings areas. They represent two parts of the banking transactions as you configure them: banking and sub-ledger areas. You can have postings in one or both areas, depending on how you configure your statements. Effectively, you can have different contents in each part of the FEBAN screen.
There are two fields where document numbers can be found in each posting area: Document and Payment on Account
Document number is filled with a proper number if your statement is successfully posted on-line and your transaction is configured to be either without clearing, or with clearing and that clearing was successful. That is valid, for example, when your Bank Statement is properly integrated with the payment process.
Payment on Account field is filled with a document number if you asked system to run a clearing transaction, but clearing was not successful. You can control whether or not “payment on account” is possible by providing the posting key in the “Posting on account” field of the Posting Rule configuration. Additional control is the checkbox “No automatic clearing” in the assignment of bank accounts to transaction types in the EBS configuration.
Other than actual document numbers, the Document number field may contain technical values:
Blank value means that the posting area hasn’t been processed yet. You can initiate this process by clicking the “Save” button on the FEBAN screen. This process is called “online post-processing”. If your post-processing is successful, it will update the document number in FEBAN.
Dash (“-“) means that the posting area is not relevant to the statement item by the Posting Rule configuration.
Asterisk (“*”) means that document generation was not requested when the statement was entered. For example, you could request system to generate a batch input session with posting transactions. You can do it either via a radiobutton on FF_5 selection screen for Electronic Bank Statement, or in Specifications for Manual Bank Statement FF67. This is an off-line post-processing of bank statement.
If you have a document number in any of these fields in any Posting Area, you can double-click it and see the document itself.
Unfortunately, there is no option to drill-down to the document number if the statement was posted off-line, even if the document has been actually posted after the statement upload.
You can also read more about EBS configuration in the Free e-book by SAP Expert.
Do you use statement upload functionality in your company?
There are several ways to record a vendor invoice and payment in SAP. Although there are several ways to post a payment, the most common of them is the Automated Payment Program (APP, transaction code F110).
The payment process does not finish with posting of a payment document. You need to inform the bank about your intentions too. The most common way to do so nowadays is to transmit a payment file to the bank.
Payment file is information about payments that you want to make: account numbers of your company and recipient (payee), amount, date, your reference, sometimes remittance information. There are multiple file formats in the world. Just to name a few: MT101, MT103, PAYMUL, XML-based pain.001 and so on. Your bank may even require their own file format, or flavour of the standard.
There are multiple ways to produce a payment file in SAP. Let’s look into them.
Classic printing program
This method goes back to times when the most common way to transmit a payment to the bank was a piece of paper: payment order or even a cheque could be produced with this method. SAP no longer recommends using this method, but all old programs are still in place. You can use them if you want.
In order to use these classic programs for payments generated by APP, you need to assign the program to the payment method. There is a number of the programs, but all of their names start with RFFO* that simplifies the search.
You then assign a program variant in the Automatic Payment Program. This variant contains program-specific parameters that should be used for printing. This “printing” may include the file generation.
This method of the payment file generation is not flexible, which is an obvious downside. You have to copy the existing program into your own namespace if you want to make any change to the standard logic.
Payment Medium Workbench
This method uses the more flexible approach to generate a payment file. If you want to use it, you need to determine your own Payment Medium Workbench (PMW) format and all its surroundings in transactions OBPM1 to OBPM4.
Once the format is created, you can assign it to your payment method.
PMW can produce either paper payment documents or files. In the latter case you need to select checkbox “Payment medium without docs” and select “File” or “XML” in the dropdown menu in transaction OBPM1.
The actual file generation logic is controlled via functional modules that you assign to your format in transactions OBPM1 and OBPM3. The further company code and house bank specific details are controlled via the variant of the program SAPFPAYM that you create and assign in transaction OBPM4.
SAP delivers a number of formats that includes globally accepted SWIFT MT101, MT103 and so on. They are also configurable, but details of configuration are different for each payment format. It is not subject of this article.
However, if default logic of the system is not sufficient for your purposes, you can change it by copying functional modules for the format creation into your own namespace and assigning your modules in OBPM1 or OBPM3. The latter place is preferred, although not all changes are possible to make there.
In case of brand new format you need to develop, you can write your own functional modules using the standard ones as example.
The downside of this method is that you still need to use ABAP to make changes in SAP standard logic or to create your own. Even understanding the configuration possibilities of the format may require you to read the ABAP code.
Data Medium Exchange Engine
As you can see, PMW formats give you enough flexibility to configure your payment method. However, if ABAP is not your strong side, there is even more flexible and user-friendly solution for you: Data Medium Exchange Engine.
To “switch on” the engine, you tick the checkbox “Mapping using DME Engine” in the format settings in OBPM1. In this case, all “plug-in” points for your functional modules in OBPM1 and OBPM3 remain in place. However, the main configuration is now controlled by the format tree of type PAYM that you maintain in transaction DMEE.
The DME Engine gives you a lot of flexibility to construct your own file or amend SAP standard. There is very little need to use ABAP coding when using DMEE, however there is still a possibility to use Functional Modules to calculate the value of certain DMEE tree nodes.
Once you created the DMEE tree and created a variant for SAPFPAYM, you assign it to your house bank and payment method in transaction OBPM4. Don’t forget to assign your PMW format to the payment method too.
What method of payment file generation do you use?
Fixed Assets is an important part of the accounting. It is usually one of the areas that are implemented in SAP, and often it goes in the same phase as all other Core Finance components: General Ledger, Accounts Payable, Accounts Receivable.
You often need to transfer data from the old (legacy) system to SAP. This process is called “migration”. There are some specifics in migration of Fixed Assets data. Let’s look into the steps that you need to make and discuss them in details.
Detach Fixed Assets and General Ledger
There is a special type of reconciliation accounts in SAP General Ledger: Assets. You assign this type of reconciliation account to the GL accounts specifically created to hold Assets acquisition costs and accumulated depreciation.
The link via reconciliation account ensures that each transaction with Fixed Assets in your SAP system automatically posts in General Ledger. You don’t need to post the same amount twice in General Ledger and Fixed Assets subledger. It also ensures that you cannot post any amount directly to the GL account linked with the Fixed Assets module.
However, you need to break this link between the ledgers during the migration. Technically speaking, you migrate GL account balances and Fixed Assets values separately.
To do so, change the account type from “Assets” to empty in transaction code OAMK, which you can also find in IMG: Financial Accounting -> Asset Accounting -> Preparing for Production Startup -> Production Startup -> Set or Reset Reconciliation Accounts.
Set parameters for migration
Before migrating data for Fixed Assets in SAP, you need to tell the system what you migrate and what to do with migration data. Most important parameters for the migration are migration date and last closed period in the legacy system.
Last posted period will tell SAP that it needs to calculate depreciation and post it in the Fixed Assets module for the next posting period. For example, if your go-live date is the 1st of January 2017, then last posted period is 12 / 2016.
Migration date is the date when SAP processes the migration transactions. It can either be the last day of the previous period, or the first day of the new period. Please note that if there are differences in depreciation amount posted during the migration and calculated by SAP, they will be posted in the next period after the migration. In the example above, if your migration date is 01.01.2017, adjustment posting will be planned to P2/2017. If you migration date is 31.12.2016, then adjustment will be posted in P1/2017.
You can find both of the transactions for date-related migration parameters in IMG: Asset Accounting -> Asset Data Transfer -> Parameters for Data Transfer -> Date Specifications.
Asset transfer date
There are a number of other parameters that you can set up for asset migration. They are relevant to amounts that you migrate. For example, you can ask SAP to recalculate the depreciation amount in the past years, or recalculate the insurance value. All these parameters are listed in the Options section of IMG next to the section I mentioned just above.
Asset transfer options
Prepare the migration tool
There are two tools available for Fixed Assets migration in SAP: using Microsoft Excel integrated tool, and using the generic migration transaction for Fixed Assets.
Although Excel tool is available and listed in IMG node Financial Accounting -> Asset Accounting -> Asset Data Transfer, I have never seen it working. The most common case is migration of Fixed Assets using the generic “manual” tool.
There are 7 transactions in that tool:
AS91 / AS92 / AS93 allow you to migrate individual fixed assets. These 3 transactions are for Creation, Editing and Display of the migration data.
AS81 / AS82 / AS83 / AS84 allow you to migrate group assets. These 4 transactions are for Creation, Editing and Display of the migration data, and for creation of the group asset sub-numbers.
There are two distinct ways for migration of assets capitalized in the current and in the previous fiscal years. Of course, this note is only relevant if you migrate mid-year. The difference is that you only migrate values for acquisition costs and accumulated depreciation for previous years’ assets. All transactions in the current year should be posted as individual transactions in the relevant section of the entry transaction.
The Current year’s Fixed Assets will only have the Transactions section filled in, and that section will include the acquisition and accumulated depreciation transactions too.
The table below summarizes the section within transaction AS91 that you need to use to enter parts of the fixed assets migration data.
Data
Current Year
Previous year
Acquisition Cost
Transactions
Takeover Values
Previous Years depreciation
n/a
Takeover Values
Current Year depreciation
Transactions
Takeover Values
Current Year transactions
Transactions
Transactions
You should familiarise yourself with transactions AS91/AS81 before creating the migration tools for your project. When you know each part of AS91 / AS81, you can create LSMWs for transactions AS91 and AS81 (if necessary).
Preparing your legacy data
You import data from the legacy system into Excel or any other data management application. It is very likely that the structure of the data will not be exactly the same as you expect it to be imported into LSMWs prepared on the previous step. That is why you will need to manipulate the data, sometimes enhancing it.
Do not forget to document each of your manipulation for audit trail purposes.
Import data
Once your import tool and source data are ready, you can input data in SAP. LSMWs using transactions AS91 and AS81 (if necessary) will create asset master records with legacy values.
Of course, it is a good idea to dry run the migration in your test system to eliminate the possible hiccups and prepare the solution for known problems beforehand.
Your GL account balances should be migrated separately using any of the available tools, for example LSMW for transaction FB01.
Reconcile the ledgers
If you look back at the very beginning of this article, you remember that Fixed Assets and General Ledger accounts were detached during the migration. Now, when the migration is over, you reconcile the ledgers.
To check the balance of GL account, you can run the transaction FS10N or FAGLB03 depending on the version of your SAP system.
To check the balance of your Fixed Assets, you can use many reports in the Information System section of the Fixed Assets menu. For example, there is transaction S_ALR_87011964 – Asset Balances by Asset class. Each Asset Class only has one GL account for acquisition costs and depreciation, meaning that transaction will provide you with information for reconciliation.
I values do not match you can edit migrated Fixed Assets data in SAP using transactions AS92 / AS82.
Link Fixed Assets and General Ledger accounts
Once the balances on GL accounts and Fixed Assets ledgers are reconciled, you put the link between the ledgers back. Use transaction OAMK for that. Change reconciliation account type to “Assets” for the GL accounts you use.
These seven steps will complete your migration cycle for Fixed Assets.
If there are any questions you have about the Fixed Assets or any other SAP module, why not ask them to SAP Expert?
Some of the features that you can use in DMEE trees are not so obvious. Let SAP Expert give you some ideas how you can use these features.
Managing imported DMEE tree names
DMEE trees are managed and configured in SAP transaction code DMEE. If you look at this transaction, you will notice that there is a “Copy” button that allows you to copy existing DMEE trees into new ones.
Apart from copying the DMEE trees within your system, you can also upload XML files with DMEE trees that you get from somewhere else, for example from another system or from SAP Note. There is a menu item for that.
The DMEE tree in the externally acquired file may have a name that already exists in your system. Of course, it is not a good idea to upload such a file, because it will overwrite your configuration.
Before uploading the file, open it in any editor you have. Notepad is good enough. At the beginning of the file, search for tags Type and Name.
DMEE xml file
The Name tag after the Type tag defines the name of the DMEE tree to be uploaded. If you look at the screenshot, the Name of the tree is SEPA_CT. Check that this name is available in your system. If it already exists and you don’t want to overwrite your existing configuration for this DMEE tree, you can edit that value to give XML tree your own name after uploading. Change it, for example, to Z_SEPA_CT, and this DMEE tree will appear in the list of trees in transaction DMEE after you upload your edited file.
But that is not the end of the story. If you want to use your new DMEE tree in the payment method, you still have to define the Payment Medium Format for it. You do this in transaction OBPM1. You can either create your new format there from scratch, or better copy a similar format. Just to remember that OBPM1 format should have the same name as your DMEE tree, Z_SEPA_CT in the example above. Once you did OBPM1 definition, OBPM3 and OBPM4 are also available for fine-tuning of your payment format configuration.
Using multi-line payment remittance information
Remittance is a text information that you want to transfer to your vendor together with your payment. Most payment file formats support a section where remittance information can be placed. Remittance is usually a freely defined text. You can decide yourself what you send as a remittance. But it is very likely that you will send a list of invoice numbers so that vendor could reconcile the payment. There are 2 considerations here. First, payment file format can allow several repetitive components (tags, segments) for remittance information. Second, you do not know initially how much information you need to transfer, how many invoices should be listed.
Usually the contents of Remittance information is generated using the Note to Payee functionality configurable in OBPM2 transaction. You can create a Note to Payee, for example Type 1, containing the invoice number and date.
Say, you file format allows you to have 2 invoice number in each Remittance segment with up to 4 segments in each payment. It means you can transfer up to 8 invoice numbers with one payment, but the question is how to split them between 4 segments and avoid using the empty segments.
When configuring the first Remittance segment in the DMEE tree, create 2 “usual” elements (or atoms) and 1 technical element in it. Assign each element to structure field DMEE_PAYD-TEXT with Key Field 1 (corresponding to Note to Payee Type 1). Give the 3rd (technical) element a special Reference value.
DMEE tree – step 1
This approach ensures that DMEE tree will refer to Note to Payee 3 times, retrieving one invoice number and date at a time. If there are up to 2 invoices, they will fill the first Remittance segment. If there are more than 2 invoices, then technical element will get a non-empty value, but it will not be output, because of its technical status.
The second segment will also contain 3 elements with the same contents, apart from the first element in the second segment being assigned to the contents of the Reference tree node. This ensures that the 3rd element will contain the invoice and date from the 3rd reading of Note to Payee, which happened when the last technical element of the first segment was created.
DMEE tree – step 2
Another consideration is that the whole segment should only be created if the value of the Reference tree node is non-initial. The Condition should be imposed on the whole segment for that.
DMEE tree – step 3
The 6th element is similar to the 3rd – it is technical-only and has a special Reference.
The third segment in the Remittance part of the payment file should be the same as the second.
The forth segment is very similar too, but it only contains 2 real elements. There is no need to create a technical element, because there is no follow-up segment for it.
DMEE tree – step 4
Now, your remittance section will contain up to 8 invoice numbers in groups of 2 invoices per segment. If there are less than 8 invoices, the segments without any invoice will be omitted.
Working with restricted characters
There is a number of characters that are restricted from use in the payment files due to technical requirements of the file format itself, or due to your bank special requirements, or both. Sometimes it is even more complicated, because bank allows the use of special characters in some fields of the file, but not in others.
There is a special tab in the DMEE header where you can define a list of allowed or restricted characters.
However, placing a list of characters in that tab is not sufficient to exclude them from the output file. You need to activate this removal as an option in the conversion function for the node where the character may appear.
You also need to understand that some file formats have technical restriction on the use of characters. For example, the use of & (ampersand) or “ (quote mark) signs in HTML/XML files is not allowed. If these characters should be in the output text, the characters should be replaced with special combinations like & or ".
Let’s assume that you gave a list of restricted characters in the DMEE tree header.
The following rules will apply:
DMEE Tree header switch
Conversion function
System behaviour for file-restricted characters
System behaviour for other restricted characters
Do not allow
Not ticked
Replace with special combinations
Remain in the field
Do not allow
Ticked
Remove from the file
Remove from the file
Allow
Not ticked
Replace with special combinations
Remain in the field
Allow
Ticked
If special character is listed as allowed, replace it with a special combination. Remove all non-listed characters.
Remove all non-listed characters
Ticking or un-ticking of conversion function checkbox gives you an opportunity to control the contents of the each file field.
However, you also need to mind that it is not only the file creation program that is relevant to what you see on the screen when checking the file. The viewer is important too. For example, if you use a browser like Internet Explorer to check the file contents, it will convert special combinations like & or " back to the special characters. That is why it is important to check your file contents not only in the browser, but in a simple text editor like Notepad when dealing with special characters.
Do you have any questions about the use and creation of DMEE trees? Why not ask SAP Expert a question?
I recently created a how-to video that shows youthe step-by-step instructions how to create an interactive Microsoft Word document with SAP structured data.

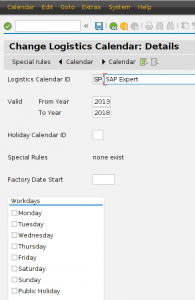
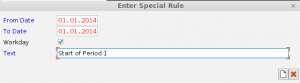
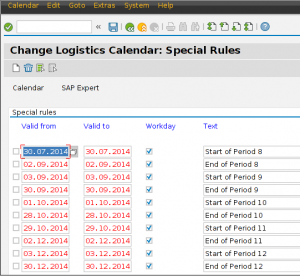
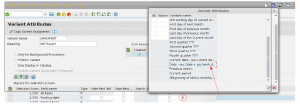

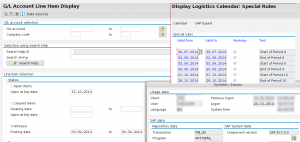


 Just to remind, a set is a very convenient tool to
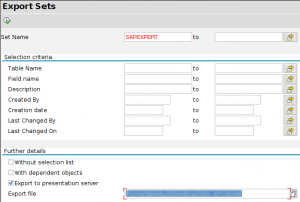
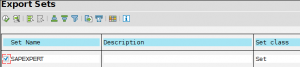


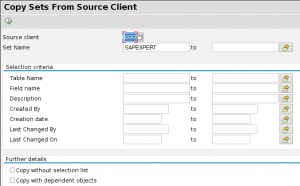
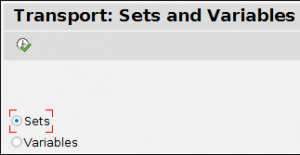
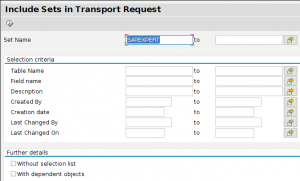

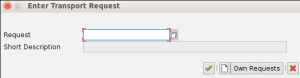


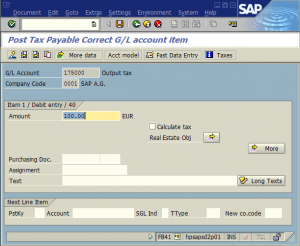
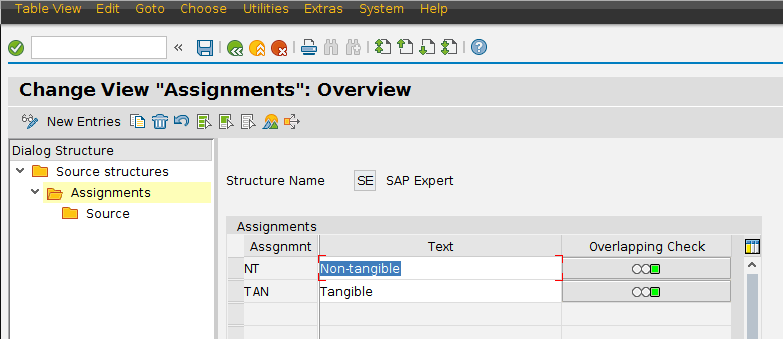


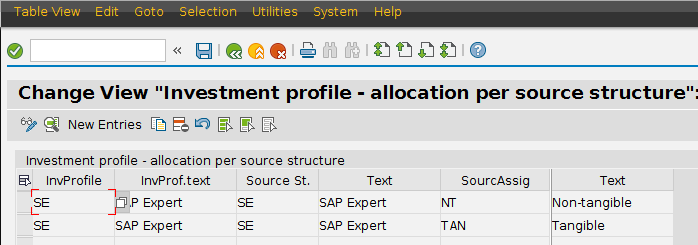

 Curriculum Vitae, or CV, or Resume is the document #1 for any job seeker. This is the document your agent and potential employer read before seeing and hearing you.


